 So, it was late at night again and I was wasting time drifting around the web when I stumbled upon the fully functional NES coffee table by Kyle Downes again - if you haven't been living under a rock for the last couple of months, chances are you've probably heard of that thing.
For those who don't know what I'm talking about, I'll make it short: Kyle took apart an NES controller, built an NES-controller-lookalike coffee table and soldered the button wires to the original NES controller circuit board. Check out his blog for more info.
 Now I do think that this project is pretty awesome, but I'm not that much of an NES fan, I'd rather prefer the Super Nintendo for its vast assortment of high quality games like Zelda, Chrono Trigger, Super Mario World or Secret of Mana. Building a Super Nintendo Controller Coffee Table would be the next logical step - so I got myself a sketchpad and started doodling around.
 Als ich vor einem Weilchen mal wieder spät nachts im Web umhergestreift bin, stolperte ich abermals über den komplett funktionstüchtigen NES Couchtisch von Kyle Downes - vor ein paar Monaten konnte man in sehr vielen Blogs mit Gamer- oder Gadgets-Bezug über dieses klasse Teil lesen.
Die ganze Geschichte kurz zusammengefasst für die, die davon bisher noch nichts gehört haben: Kyle hat einen NES Controller zerlegt, nach dem Vorbild des Controllers einen Couchtisch mit funktionsfähigen Steuerkreuz und Steuerknöpfen gebaut und die Kabel davon auf die Platine des zerlegten NES Controllers gelötet. Mehr Infos dazu findet ihr in seinem Blog.
Natürlich finde ich dieses Projekt ziemlich cool, ich bin aber jetzt nicht so der große NES Fan und würde der Konsolle stattdessen das SNES vorziehen. Die Spielebibliothek ist da viel, viel größer und beeinhaltet so zeitlose Klassiker wie Secret of Mana, Legend of Zelda oder Chrono Trigger. Einen Super Nintendo Controller Tisch zu bauen, war also nur der nächste logische Schritt - ich holte mir einen Skizzenblock und fing an zu kritzeln.
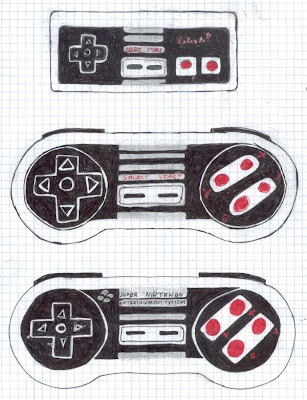 First, I drew a sketch of the original NES controller, to get a feeling of the proportions and the positioning of the buttons. Since I've never really liked the design of the original SNES controller, I tried to transfer the NES controller design to the SNES controller shape. I toyed around with the design and tried several different approaches until I got a design I actually liked (the one below). Um ein besseres Verständnis für das Design und die Plazierung der Knöpfe zu bekommen, skizzierte ich zunächst den original NES Controller. Da ich den SNES Controller nie wirklich gemocht habe, versuchte ich dann, das Design des NES Controllers auf die Form des SNES Controllers zu übertragen. Nach ein paar Skizzen und verschiedenen Entwürfen hatte ich dann schließlich ein Design, das mir soweit auch gefiel:
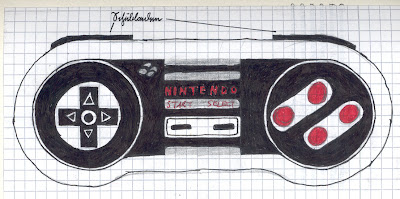 Now that I had a design I could work with, I went on with the actual construction planning. A big problem would be the shoulder buttons (L + R) - since you cannnot possibly press those while playing comfortably on a large-scale controller, I decided to include the buttons on the table as drawers while using foot pedals for the actual activation of the L + R buttons. Another problem would be the round shape of the controller's "edges", so I figured I could saw out several identical round pieces out of pressboard and glue them together - see the picture below for a sketch. I would then sand the shape, seal it with compound filling, sand it again to smooth out the surface and finally paint it. Anschließend machte ich mich an die konkrete Planung des Bauvorhabens. Das erste Problem, das mir in den Sinn kam, waren die Schultertasten (die L- und R-Knöpfe beim SNES Controller) - da man beim Spielen an diese nicht wirklich rankommt, entschied ich mich, die Knöpfe am Tisch zu Schubladen zu machen und Fußpedale zu verwenden, um die Schultertasten zu aktivieren. Ein weiteres Problem war die runde Form des Controllers. Mir kam dazu schließlich die Idee, mehrere dieser runden Umrisse aus Pressspanplatten (Pressspan verzieht sich nicht und lässt sich im Vergleich zu normalen Holz wesentlich leichter abschleifen) auszusägen und aufeinander zu leimen. Man müsste die Lücken dann nur noch mit Spachtelmasse versiegeln, abermals abschleifen und könnte den Korpus dann direkt lackieren. Auf der (grauenhaft schlechten) Skizze unten könnt ihr sehen, wie ich mir das in etwa vorgestellt habe.
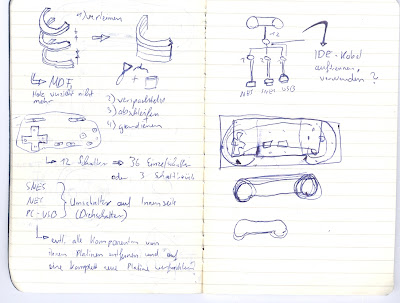 While I was busy thinking about the wiring and how to connect the button switches to the circuit board, it occured to me that it'd be a waste to wire this coffee table controller to just one system. "If I can wire it to an SNES circuit board, I can wire it to an NES circuit board as well. And why not use a USB circuit board as well? You could then use the controller to play computer games and even the old arcade machine games via M.A.M.E. emulation." Während ich mir Gedanken über die Verkabelung machte und überlegte, wie ich die Schalter der Knöpfe mit der Schaltplatine des Controllers verbinden könnte, kam mir der Gedanke, dass es eigentlich eine totale Verschwendung wäre, diesen Tischcontroller für nur ein System zu verkabeln. "Wenn ich den Tisch mit einer SNES Schaltplatine verkabeln kann, kann ich ihn auch mit einer NES Schaltplatine verkabeln. Und eigentlich sollte ich auch eine USB Schaltplatine verwenden, dann könnte man auch Computerspiele und alte Spielhallenklassiker per M.A.M.E. damit zocken."
